

Bluegrass banjo is a unique style of banjo playing that originated in the Appalachian region of the United States. It’s characterized by its use of fast, virtuosic picking patterns and syncopated rhythms. If you’re interested in learning how to play bluegrass banjo, this article will provide you with a comprehensive guide on how to get started.
Use this Free Banjo Tabs resource to help you along your way.
Learn to Play Bluegrass Banjo
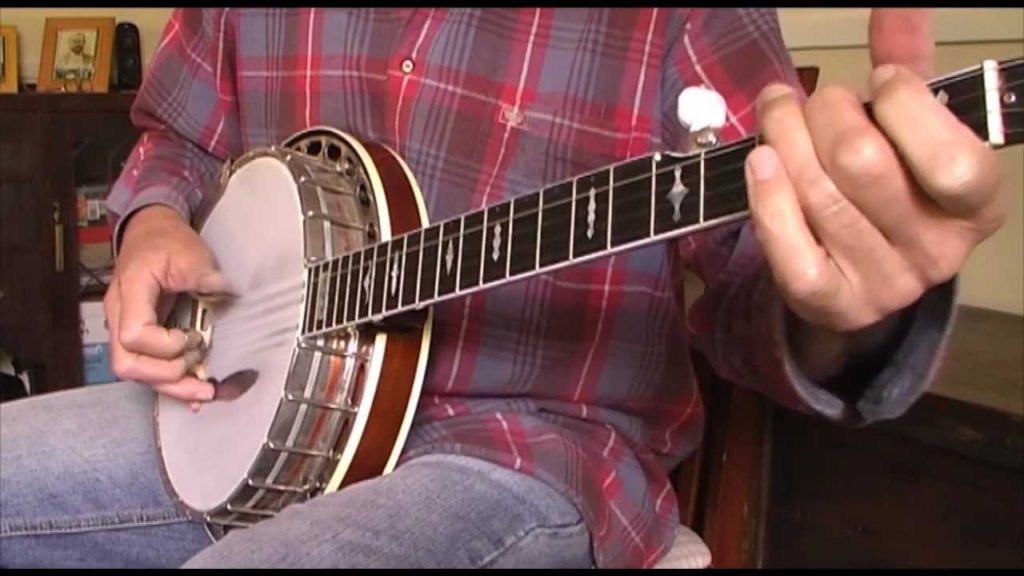
Step 1: Choose the Right Banjo The first step in learning how to play bluegrass banjo is to choose the right banjo. A standard bluegrass banjo has five strings and is usually played with fingerpicks. Look for a banjo that’s well-built, has a resonant sound, and is comfortable to play.
Step 2: Learn Basic Chords Once you have your banjo, it’s time to start learning some basic chords. Bluegrass banjo is typically played in the key of G, so it’s important to start by learning G, C, and D chords. These chords will form the foundation of many bluegrass songs, so it’s essential to master them before moving on to more complex patterns.
Step 3: Master Right-Hand Techniques Bluegrass banjo is known for its fast and intricate picking patterns, so it’s important to master right-hand techniques. Start by practicing alternate picking, which involves picking the strings in a steady up-and-down motion. Once you’ve mastered this technique, you can move on to more complex patterns, such as rolls and arpeggios.
Step 4: Practice Your Timing Timing is crucial in bluegrass banjo, as the syncopated rhythms are what give the music its unique flavor. Practice playing along with a metronome to develop your sense of timing and ensure that your picking is in sync with the beat.
Step 5: Learn Bluegrass Standards Bluegrass banjo has a rich tradition of classic songs and standards that are essential to the genre. Start by learning some of the most popular bluegrass tunes, such as “Foggy Mountain Breakdown,” “Cripple Creek,” and “Old Joe Clark.” These songs will not only help you develop your technique but also provide you with a repertoire of tunes to play with other musicians.
Step 6: Play with Other Musicians Bluegrass is a social music, and playing with other musicians is an essential part of the experience. Seek out other bluegrass musicians in your area and attend jam sessions or open mic nights. Playing with others will help you improve your skills, develop your sense of timing, and learn new songs and techniques.
Step 7: Attend Workshops and Festivals Attending bluegrass workshops and festivals is a great way to learn from experienced musicians and immerse yourself in the culture of the genre. Look for workshops and festivals in your area or consider traveling to a bluegrass hot spot, such as Nashville or the Appalachian region, to fully immerse yourself in the world of bluegrass banjo.
In conclusion, learning how to play bluegrass banjo takes time and dedication, but the rewards are well worth the effort. By following these steps, you’ll be well on your way to mastering this unique and exciting style of banjo playing. Remember to practice regularly, seek out opportunities to play with others, and never stop learning and improving your skills.
In this video series by Jim Pankey, we show you everything you need to know in order to learn how to play Bluegrass Banjo. Each free beginners Banjo lesson builds on the last, with almost an hour of tips and tricks to get you started on your Banjo playing Journey.
Banjo Lesson 1 Video Text:
0:00:00.3 –>
hello in there I’m back over the years playing and teaching banjo people come up to me all the time and say man I sure wish I’d learned to play the banjo I bought a banjo back in 1948 and just never learned to play it well it’s time you got a banjo have you learned to play it you have it well it’s time to learn so tell you what I’m going to wait while you go get your man Joe I’ll be right here go get it what you waiting on go get your banjo all right ready you got it okay I’ll wait a little bit more like a dust off of it it’s behind the couch there it is yeah now I’ve waited hopefully are you ready we’re going to learn to play seriously
0:01:02.6 –>
you can learn you can learn the banjo now I’m over the next few weeks I’m gonna walk you through how to get started playing the banjo and it’s not hard and I know I say that in my other videos if you watched any of them I always say this stuff’s not hard it’s not hard I promise you so you first of all the banjo we’re going to learn is five string banjo this one’s got this little short string on the side of the neck mr. Jones Chang now back back in the back in the old days when Gibson started making banjos they called this an RB which stood for regular banjo so regular banjos have five strings now leading by fool you so we learned five string banjo and we’re going to learn a fingerstyle banjo so or three fingerstyle scrouge style bluegrass style banjo and that’s what I’m going to be showing you and we may do some
0:02:02.7 –>
old-time frailing climber videos in the future as well but for today we’re going to get you started playing free finger banjo so here we go you’re going to need some finger picks now you don’t have to have them I just seriously recommend them you’re going to need a thumb pick just a pick that will go on your thumb it look like a little tooth you need that and you’re going to need finger picks I need one for pointer finger one for your social finger middle finger so you need finger picks so that your thumb pick two finger picks and that’s all you’re going to need for this hand hopefully you’ve got all five strings on your banjo still and we’re going to try to tune up because you got to be in tune really for what we’re going to learn today you don’t even have to be in tune it’ll just sound better if it’s in tune so I want to do I do want to show you how to tune
0:03:00.3 –>
up and then I’m going to give you a couple – – right hand things to learn and that’s all you’re going to get today because that’s all you need today because I want you to get those things down really nice and smooth before we try something else Oh another thing you need and I almost forgot you need a good you need a good straight back chair don’t be piled up on the couch don’t weigh back in your recliner you need a good straight back chair and it sounds like torture but you need something you can sit up in and play you want to be hunched over staring into a video screen alright so here’s what we’re going to do we’re going to tee it up first and so what I’m going to do is I’m going to give you the notes for each string I’ll play them and I’m going to show you how I tune and then we’ll get you started but you can you can buy a little tuner
0:04:01.8 –>
for your free banjo something like that this is just a Planet Waves tenor this one’s kind of old but it it’s kind of lights up and it tells you what note you’re playing and whether or not you’re in tuned and I’ll use that or you can download an app for your phone well you got a iPhone or Blackberry or Android phone windows phone you can get a attending app for your phone and those are and you can get them for free and then there’s some you can pay for so what whatever floats your boat I mean even if you’re paying for you paying a couple bucks so it’s cheap let’s get tuned up and so I’m just going to play you some notes so your banjo is tuned to G and that’s not perfect but
0:05:00.1 –>
it’s close enough and it’s good enough for us so you want your first string and the first I count them from the floor to the ceiling so the first string that’s your first string so you want to match your string to that that’s your first string that’s D all right so tune it until it sounds pretty close to that so if it’s too low teen up to that and then the next one’s a B that’s your second string ah let’s be just you into that it’s too low you tune up to it or too high you tune down to that and then third string that’s a G mine’s a little too high that’s close enough for what we’re going to be doing in future lessons I’ll make sure that I mean
0:06:00.6 –>
really good perfect team and then fourth string is D again but lower octave lower that’s our D and then fifth string well here’s your fourth string again a couple more times [Music] and then the fifth strange it’s not perfect it’s close enough for what we’re going to do today now but your finger picks on you don’t have to have them but I really really really really recommend them they’re going to help you make make your life a little simpler not at first a little awkward you sue but put them on and suck it up cupcake you can wear
0:07:00.1 –>
these finger picks so here we go so here’s what we’re going to do so the first thing I’m gonna turn here a little bit so you can see what’s going on Jack the banjo up here I’m going to take my right hand and a lot of people will tell you to you’re going to now I like to hold the banjo here let me adjust my camera just a little bit adjustments on the fly hold the banjo in your lap not on your leg not on this leg right in the middle right in your lap that’s where you want it and you want to take you can take these two fingers and you can touch the just touch the head with them and you want to curl your other fingers now I just use my pinky I know some of you said you’re just not going to do it right if you’re just going to use your pinky or just not gonna pay any it is use my pinky I started out not using
0:08:00.5 –>
any and then somebody says hey you got to plant both fingers so and I saw her Scruggs you know and he had both fingers down so I did that for a while and then now I just use my pinky because frankly that’s just what feels comfortable to me and so I’m um I’m not going to you plant what you want you can either put your you can plant your ring finger down ban it let you think you stand up they’re all properly you can plant them both you can plant your pinky I don’t care pick one but you’re going to have to plant something really it’ll help you all right now what I want you to do here we’re going to dive right in we’re going to learn a pinch pattern or a basic rhythm and we’re going to take our thumb and we’re going to hit the third string now that’s the one in the middle so the third just like that with our thumb not hard so just thumb and then you’re going to take your middle finger and your thumb and you’re going to pinch
0:09:01.5 –>
both at the same time the top and bottom or the first and fifth sounds just like that so three and then pinch I do that a bunch you can count when you do it one two three three simple all right that’s your basic rhythm now I’d like you to okay so we did off a three and we can do it off of four to four so furry for now I want you to do this a bunch now that’s your first pattern that I
0:10:03.1 –>
want you to practice until your whole family’s sick of it now the next next little bit is the it’s an alternating thumb roll and then since a little more difficult but I’m going to show you and this is and this’ll beat it this is we’re going in this lesson so we’re going to start with the thumb on the third index on the second thumb up on the fifth and middle finger on the first string so it sounds like three two five one so there so that’s your
0:11:02.9 –>
so that’s your pattern that I want you to practice this week I want you to do anything else I want you to do that 3 pitch for pitch and then I want you to practice this role now if you get bored with that you can do 4 to 5 now when you come back next week I want you to be able to do them both together so here you go 3 pitch for pitch 4 notice that the pinches are slow the roll is faster if we count them goes
0:12:02.4 –>
1 2 3 4 1 & 2 & 3 & 4 & 1 2 3 4 one two three four one two three four so there you go we’re going to get you started on the banjo see you in a few days get that practice practice practice practice practice don’t try to skip ahead don’t be out there on the youtubes looking for what do I do next I want you to practice that once you get it good and smooth smooth is where it’s at so work on that and we will see you in a few days and I’ll give you something to do with this hand but don’t even worry about
0:13:03. –>
there to put it in your pocket yeah we’ll see you next week or in a few days or whenever I finally get around to it dad gets you started we’ll see be sure to subscribe.
Banjo Lesson 2 Video Text:
0:00:01. –>
welcome back now a few days ago I started you with a basic banjo lesson number one and I gave you two right-hand things to do I gave you a roll pattern I don’t even know if I even told you the name of it it doesn’t matter and I gave you a little pitch pattern so let’s review those real quick and then I have some encouraging words and then I’m going to show you something new today the day’s lesson won’t be super long because I want you to have just a little bit of information to work with I want you to get it good and clean and smooth before you advance to Phase three so the roles that we practice we practice the pitch pattern it’s just the three pins of our third string and then pinch on the top and bottom with your thumb and middle finger three already
0:01:01.8 –>
remember you need to rest a couple of fingers either your ring finger your pinky ring finger and pinky but rest something there you can see where I’ve that black spot on the my banjo head is where I’ve rested my fingers and that’s not well there’s some dirt there but mostly it’s just where the the coating or the paint on this head has worn off so anyway so that’s your three pitch for pitch and I hope you practice that enough so that you could sit here and hear you long conversation with me and do it it’s kind of like walking we should be able to walk and talk and if they don’t have only the number that you can leave that and not have to think about it the whole eye one I want you to go back and practice that some other same same thing with the other pattern alternating role which I gave you is three to five ones of funny
0:02:04.1 –>
[Music] you should be able to do that I have to think about it a whole lot so today we’re going to add so if this is walking today we’re going to add a little cueing gun so 3/5 or 803 now you got to be honest with yourself you could you won’t disappoint me but you’ll disappoint yourself if you’ve not really given yourself plenty of time to get that down and it’s ok if it takes
0:03:02. –>
you longer than 3 or 4 days to get that work on it spend some time every day getting that roll down getting getting that pattern to where it’s comfortable so you don’t have to think about it because you’re not going to have time to be thinking about it we’re going to we’re going to constantly add more and more things on top of that that’s just that’s the basis that’s the foundation of what we’re going to build on and so we’re going to have things that we put on top of that that we will have to think about so I don’t want you to have to think about the role I tell my students all the time no thinking you know don’t be thinking you just have to be able to do that I mean I’m sure none of you well we’ll say none because there’s always that exception that has to think when they walk a left foot right foot you don’t want you don’t want to be doing that you just want that role to happen and so spend a bunch of time practicing it and if you if you really
0:04:02.5 –>
haven’t spent that time stop this video go back and do that and then come back when you’re ready you you’re ready this video of wait and so you go practice but today we’re going to work on our left hand the beauty of this thing is it’s only one finger we did we’re just going to use one finger on our left hand we’re going to give it two jobs today we’re going to do a slide and we’re going to do a hammer on and you think well most hanjo player teachers they showed me how to do some chords and then I’m not going to do that I want to get you play it I want you to play a song I get you to play this song you are hooked and then then you can learn if you
0:05:04 –>
learned this and I think it’s going to give you the confidence to learn anything else that you so desire so let so when we get through our lessons in which there’s probably only going to be a couple more after this where we’re going to get you through a song pom toe and get you playing something and it’s not the goal you want to be able to play the banjo so today slides and hammer ons and we’re just going to use one finger we use our middle finger on our left hand your social finger let me scoot it around here get a little better view for you you remember our banjos in our lap not on the leg and remember we’ve got our straight back here straight back chair all right we’ve got our picks on some
0:06:00.6 –>
pick two finger picks I really don’t care what brand of finger picks that you use does it does not matter to me it’s not important all right so here’s our first thing we’re going to do we’re going to take our middle finger it’s our social finger I show you that but then I get a bunch of downloads so and take our so and we’re going to go to our third string so one two three and we’re going to be right there that’s all now I want you to hold that string down now how tight do you hold it well was let’s just touch it don’t sound so hot so you got to push down a little bit of pressure that’s a little baby little harder and that’s you know that’s all I
0:07:02.6 –>
want you to do is once you hit that string and let that note ring now here’s the part that you may not enjoy we’re going to slide that finger to the 4th fret so we’re going to hit that string and slide to the fourth fret now your fingers may get sore okay truth is your fingers will get sore but only one or your social finger so it’s going to get sore so you’re going to hit that note and then we’re going to slide it up to the fourth fret so to there to force so hit the note and then slide no slide and that is a slide nothing more nothing less there you go
0:08:00.2 –>
no slide just the third string and I want you to do that a bunch and that’s your slide then your hammer on no the middle finger thing you’ll hit your fourth string that’s the big one going to hit here get it good and solid and then you’re going to take that middle finger and we’re going to put it down at the second fret really quick and it’s going to make a noise so hit hit the string and then put your finger down put it down quick don’t put it down slow put it down slow that sound like that’s no good you want it down quick so here the nerve is hammer let’s call the hammer I’ll hammer on so you got
0:09:12.6 –>
slide and hammer slide hammer on now those are two things I really want you to spend a bunch of time doing I want you get them clean I don’t want to hear any well I’m not gonna hear anything unless you track me down and play the banjo for language I’d be okay with that but we held but I want you to do it I don’t want you to hear any dead notes or [Music] buzzing or rattles or anything I want you to I want those notes to be super clear when you play them so you got to listen to what you’re doing now what let’s complicate this just just a least
0:10:01.8 –>
little bit because you got a left hand thing and you got a right hand thing what’s let’s put them together let’s listen let’s do it with that first little pinch pattern so remember we went three P’s for all right back up here a little bit you’ll get all of me in there what’s nice we need to see all of me o3o now remember what we did we had a slide that was on the third string and a pinch that was on the fourth string so let’s let me show you what I want you to do I want to hit three slide and then the hammer the Hammers on the fourth string so play hammer so once you try to do
0:11:06.6 –>
that this week all right you got that and then we can practice it with our roll it’s alternating roll is remember it’s three to five one or thumb index thumb middle so remember goes we did three to five one and then we did it off before so lovely slide for we’re going to hit the hammer [Music]
0:12:09.1 –>
I hope that makes sense now you got your slide to one and then hammer to five fine now look that doesn’t seem like a lot of information or maybe it does so I need you to work work work work work on that and get it smooth and refer back reverb back to the video you can hit the pause button or stop or you can rewind you can do that as many times as you want to I’m okay with that it won’t bother me a bit because I won’t know you’ve done it so you back that video up and you go through each of those spots until you do you understand it until you
0:13:01.6 –>
get it in your ear and I want you to be able to do that rolling pinch smooth so where you’re not thinking about it and I want I want it to be natural and I want the slides and that hammer on where you can do it without thinking about it because if you’re thinking about it you want you won’t be able to think ahead and some point we’re going to have to be thinking ahead in our song to know what’s coming up next so for those of you that’s move along pretty quick give you one more little thing we’re going to just combine those two two pieces and you work on those okay and then I’ll see you again back here and 34 days shouldn’t take you too awful long to get that smoothed out but if it takes you three four weeks then you come back in three four weeks there will be a video here waiting for you alright y’all be sure to subscribe to but let me show you this real quick so
0:14:02.7 –>
you can do your slide where you can your child and then a hammer and then do the roll so I know that that may seem like a lot and if that’s overwhelming just go back and work on those slides and hammers and then slowly incorporating into your right hand pattern too and I promise you you can do this I have little kids and old kids do this and so I know you can too it’s just a matter of spending the time with it and I wish you wish you would spend you know a little bit of time every day I tell my students that I want you to practice
0:15:01.7 –>
every day that you brush your teeth now okay you don’t have teeth all right I want you practice every day so we’ll see you in a few days subscribe hit the like button and go back and watch the other video that’ll help you get tuned up and next next time we’re actually going to start on we’re actually going to start on song I promise you we’re going we’re going to start on we’re going to start on the chin and then I’ll show you a quick and easy way to check your 10 and without using a tenner and that’ll that’ll be next week’s that would be next week’s lesson until then y’all y’all have a great day we’ll see you in a few
Banjo Lesson 3 Video Text:
0:00:02.3 –>
hey y’all i’m back again this is lesson three and three three fingers uh and this lesson is gonna actually start you out on the low part of creek and we’re going to take stuff we’ve worked on there will be no new material today this lesson is going to use the roles that we learned the pinch pattern and that alternating roll from lesson one and then we’re going to use our hammer on and our slide from lesson two and that’s it and we’re gonna we’re gonna build the uh low part of creek and you know it’s picking and grinning thing from hee haw so you you know this you’ve heard it and and you can do it now if you don’t have your rolls as smooth as you want them
0:01:00.3 –>
then don’t do this lesson yet keep working on those rolls until they’re smooth and you’re happy with them if you’re not happy with the way your hammer sounds or your slide sounds then continue working on those before you tackle this lesson three work on those get them smooth uh skipping ahead and trying to do things that you’re not ready for that really won’t help you you got to get those foundational things down first and and i don’t say that to be mean i just say it to be realistic you know i’m not trying to hold you back if you get those rolls down if you get the that slide down and the hammer down and then you’re able to do it like we did in the last lesson you know slide with a roll hammer with a roll you know then then you’re ready for this and if you can do that then this lesson is going to be a breeze so you’ll be able if you’ve done all of that by the end of the day today or
0:02:02. –>
tomorrow whenever you start this and really work on it you you’ll actually be able to play creek and drive your family crazy and at least the first part of creek and then the next part next part’s even going to be easier so let’s just get started on it first thing let’s just go through our tanning and i think i’m pretty close i’ve used a uh i’ve got a little electronic tuner here there it is it’s that guy right there and that’s what i’ve used today and so there’s your first string it’s a d [Music] and your second string that’s a b third string fourth string oh here’s your third again then your fourth
0:03:01.1 –>
[Music] there’s your fourth and finally your fifth string which is a g and i’m pretty close it’s not perfect but that’s okay but this week tinning kind of matters because we’re actually going to be playing a song and so we want it to kind of sound in tune or we’re pretty close all right so we’re going to be using our alternating roll so let’s just do that a couple of times and just just do it off the third string today [Music] you remember that and then off the fourth [Music] just stuff like that that’s all we’re gonna do and then remember our three pitch four pin and we won’t actually well you’ll you’ll see how we’re going
0:04:00.7 –>
to utilize that pinch and it’s it’s breeze so what we’re going to do is we’re going to start with that slide and remember our slide we’re going to do from two to four on the third string so we’re gonna do that with our roll so slide two five one so that’s three two five one so side two five [Music] so that’s part one so we’re going to do that one time we’re going to slide [Music] and then we’re going to do that same roll but we’re going to do it open then we’re going to do the slide again with the roll [Music] and then we’re going to do our four pinch four and then pinch the top and bottom
0:05:01.1 –>
all right so here’s what you’ve got you’ve got slide with the roll so each of these i’ll i’ll just either say slide and then i’ll say open and i’ll say slide and then i’ll say four pinch and all we’re doing each time there there’s a roll there so slide with a roll and then slide without the roll or no slot a roll without the slide and then slide and then four so again this time i try to stick it all together slowly [Music] open slide four pinch now if you know the words you can put the words to the song with it here they kind of fit like this so it’s [Music]
0:06:00.2 –>
going to run [Music] so that’ll help you keep it in your head what’s going on so that’s all we’re doing [Music] now the second part’s just as simple so that’s the that’s just the first first half of that part and then the second half is starts with that slide again and then open just like we did now this time we’re going to do our hammer on it’s on the fourth string remember that hammer from open that so it’s going to be hammer two five one and then three pinch so that second part is slide open hammer
0:07:03.8 –>
so one more time [Music] so let’s go through the hole so that’s that builds your whole a part or low part to creek so let’s just go through real slow slide open slide four pitch slide open hammer three pinch let’s do it again i’ll try not to make many mistakes slide [Music] open slide [Music]
0:08:11.5 –>
go [Music] so i want you to do that a bunch this week so slide open [Music] so each one of those is alternating rolls two five one three two five one three
0:09:00.7 –>
two five one four pinch three two five one [Music] does that make sense i think it does so i’ll play through it just a little quicker so and give you something to shoot for this week while you’re practicing that this is lesson three so by lesson three here we’ve we’ve actually got a song or part of a song that we can play and really lesson four we’re going to have just one little simple thing we’re gonna learn for lesson four and then then you’ll have the whole thing a creek or at least one break and you know you’ll be able to play through creek so here we go one two ready play [Music]
0:10:03.7 –>
it repeats [Music] so work on that a ton this week by the end of the week you’ll sound like [Music] [Applause] [Music] so there you go that’s lesson three looking forward to seeing you again in a few days and we’ll do the next part practice practice practice put a lot of time in it uh take these pieces slow get them super smooth and you you wanna you want to be able to play it without
0:11:01.2 –>
thinking about it and i know you can do this i learned how to do it i know you can learn how to do it and we will see you in a few days but if it’s a few months before you’re ready to see it that’s cool too y’all be sure to subscribe hit like please and i appreciate it if nobody else does and we’ll see you in a in a few thanks again.
Banjo Lesson 4 Video Text:
0:00:02.1 –>
welcome back so this is lesson 4 so if you’re just now discovering these videos there’s three more and we will finish up the high part or the rest of Creek in this lesson and this one I’m going to ask you to do a couple of new things you so there’ll be a couple of new skills for you today but I don’t I don’t think you’ll have any problem with them there’s the beauty of this part is you already know half of it from the low part of Creek so you just have you have just a few measures of stuff musically to learn and then the rest of its going to be some new stuff but fortunately it’s all it’s all pretty pretty simple we’ve been doing the role you’ve been practicing alternating role thumb index thumb middle well we’re going to do a new little role pattern today it’s only going to be four notes
0:01:01.4 –>
it’s just a forward roll and it’s five to one five thumb index metal and then when you get to the end of that we’re going to hit the first string with our middle finger and then we’re going to pinch so so let me do it again [Music] that’s all that’s going on and you can actually sit and I recommend it just sit and practice doing that over and over as much as you need to all right next thing we’re going to do another little new new idea we’re going
0:02:02. –>
to slide on the first string we’re going to slide from 2 all the way to 5 and we’re going to do it with a pinch but what we’re going to do is we’re going to hit that pinch first so hold your first string and 2nd fret and pinch let it ring and then slide all the way to 5 slide stay your middle finger there slide it slide when you get to the fifth so I’m going to go pinch slide when you get to that fifth fret pinch again so it sounds like pinch slide pitch and if you’ll say that when you do it it will help your timing to just like pinch slide pitch after that pick that finger up you’re going to eat your first string and then you hit your second string so I just use my middle finger and then my first finger so it’s slide one they’re
0:03:06.8 –>
all quarter notes even that slide we can’t look out in it slide pinch run that makes sense right hope so all right because I got you in use another new skill we’re going to do part a a partial C chord don’t need the whole thing just need part of one we’re only going to use it for just four notes and then we’re going to be right back off of it again so no reason to grab the whole thing and stress over the C chord we’re going to use its two fingers we’re actually going to implement our first finger for this one so I’m going to take our first finger put it on the second string at the first fret skill just right there then our middle finger and one we’ve been using its properly sore after practicing all those slides and then we’re going to put it on the first
0:04:02.2 –>
string at the second fret looks just like that except yeah you can see that right here’s where we do that new role at five-to-one five that’s all we do hold that down [Music] now pick it up it’s open nothing going on the left-hand hitch first ring and then pinch so five easy-peasy now we’re going to do something we’ve already done so in the video number three we had it’s a slide with our alternate roll and then it open then a hammer and then the three stop right there on that three just let that with
0:05:00.8 –>
don’t put the pinch on the end you can handle that right relieving stuff out easy to leave stuff out so got slide [Music] hurry we’re going to do it again so put that finger down here’s that pitch pitch slide pinch one soon partial see open line [Music] for free so let me do that a couple of times and it does it two times two times five free free which put the pinch back
0:06:08.8 –>
on the end so that’s your high part does that make sense let me do it again [Applause] [Music] [Applause] [Music] so that’s your high part now do the low part that we did in lesson three don’t
0:07:16.1 –>
put the pinch on the end just let that third string ring right there then you can go back to your high part put the pinch on the end takes you back to the low part so quick little tip this may help you may not leave the pinch off when you’re getting ready to go the high part put the pinch back on at the end
0:08:01.3 –>
when you’re getting ready to go the low part that’s kind of how I remember it my brain whatever it takes for you remember it’s fine do it your way this is a way to do it this is the way I do it but you don’t have to do it this way so I’m gonna play through it one more time real slow I’ll start it with a high part and then do the low part I know I taught you the low part first but we’re going to do the high part first and then do the low part talk to the low part first because it was easier so here we go I’m going to play the medium tempo I’ll try to talk a little bit as I’m going through it to give you tips of where everything is and then I’ll shut up and so I’ll play through it twice all the way through and then I’ll just leave you all to practice Oh [Music]
0:10:32.7 –>
going up creek to have a little fun that’s why we’re doing this right we having fun yet all right so y’all work on that a bunch play it play it play it drive your family crazy drive your friends crazy say hey look I can play creek and you can so you can do this next video I’ll will break down some just simple tips and tricks and things to think about and I’ll give you a little something different to try on creek but you practice practice practice
0:11:01.2 –>
practice refer back to the video if there’s something you don’t understand pause the video back up watch it again watch it over and over I don’t mind I really don’t and thanks for watching really appreciate it hit the subscribe button that way you’ll get notifications when I do post a video out here lesson and be sure to hit like tell your friends we’ll see you next time.
Banjo Links
Banjo Interview – Kyle K. Smith – Banjo Set up Specialist