

No matter how hard you try to understand and grasp certain concepts, you can’t help but feel that there are some things that are too technical for you to understand.
If you’re a music recorder or someone engaged in a work or a hobby related to it, you may have come across the process of compressing your audio output to produce better sounding music. If you haven’t done this before and have absolutely no idea on how to do it, you might have already read several articles and still end up not understanding how it works and what compressor ratios do to help in the process. So, here is a simplified guide in using the compression ratio to make the best sound out of your music.
The Ultimate Guide To Compressor Ratios
What Is A Compression Ratio?
A compression ratio is the ratio which determines the amount of compression or attenuation that is to be applied to a signal entered into the compressor in order for the same to rise above the set threshold in sound recording or similar activities. When the input signals exceed the threshold, the compressor will start to work on it and let signals pass through depending on the compression ratio which was set by the user. You will be able to control the compression ratio through the ratio knob on the compressor unit itself.
Simply speaking, through compression ratio, you can reduce the volume of sounds which are louder than other parts of a certain track or increase the quiet sounds of your audio output by compressing the audio signal’s dynamic scope.
Here are the two ways you can use a compression ratio:
- Downward compression is when you lessen louder sounds over a threshold while keeping the quiet sounds in their original state.
- Upward compression is when you increase the loudness of the quiet sounds below a threshold but still keeping the louder sounds in their original state.
Compression ratios are usually expressed in the unit of decibel (dB) and there are different kinds of ratios to choose from based on the kind and brand of compressor to be used.
You may ask, “Aren’t all compressors the same?” The answer is no. The type and brand of compressor is important in understanding compressor ratios so you have to make sure you have the proper and fitting compressor unit since it will help you produce the best audio output depending on your goal. If you are familiar and confident with the compressor you have, then you may skip the following portion.
Types Of Compressors
Compressors come in both hardware and software. In both kinds, you will come across some common parameters and controls which you can study and play around with to have a grasp of its compression effect on the sound of the music or track you are going to change.
While compressors all have a common job, you will need to choose the type of compressor that will fit your needs or preference as the type and brand of compressor will have a huge effect on the overall sound of your audio. The features you should always consider when checking out compressors are the duration of the attack time and release times, and the compressor’s other internal components.
1. Tube Compressor
The tube compressor is considered as the oldest type of unit for compression. While it is the oldest, it gives off a unique classic sound which you may not achieve when using other types of compressors. This classic sound is due to the slower attack and release times of the tube compressor.
2. Optical Compressors
Audio signals are reduced by optical compressors through a light source and a visual cell. Through an optical compressor, you can alter the form of energy into another kind. The concept is that the device can make electricity into light and vice versa. The light source emits more light when the range of an audio signal which was entered, is increased. As an effect of having more light emission, the visual cell reduces the range of the output signal.
This kind of compressor works well on bass, vocals, and strings.
3. Field Effect Transistor “FET” Compressors
The FET compressor produces a tube sound with the use of transistor circuits. It has a catchy nature which in turn creates a warm and full sound. This type of compressor is ideal for guitar, bass, vocals, and even room microphones, among others.
4. Voltage Controlled Amplifier (VCA) Compressors
The VCA Compressor is design to create a more controlled audio output and make the track more unified. This kind of compressor gives off a great impact on the sound of the music which is perfect for certain drums like snare or electric guitars as it keeps their sounds uncompromised and make them strong.
Compressor Controls & Features
The compressor ratio must be used and adjusted along with the other controls and features of the compressor for a better result. Here are the controls and features you should consider when adjusting the compressor ratio:
- Threshold – this is the extent at which a signal entered should exceed in order for the compressor to start acting on the input sound. For instance, if the threshold level is set at 10dB, the signal will be compressed only if it goes above 10dB. Otherwise, the compression will not take place.
You have to take in consideration that the threshold feature is subject to the “attack and release” settings of the compressor.
The “attack” setting slows down the compression when the audio input exceeds the threshold. The compressor picks up and carry on with its work when the audio input drops, not reaching the threshold set, the duration of which is caused by the “release” setting.
- Attack – this is the total of time it takes for an audio entered to be fully compressed after reaching and going beyond the threshold level required. The duration of attack times depends on the type and brand of compressor unit used.
- Release – this is the amount of time it takes for an audio input to go from being compressed to going back to its original uncompressed state. Again, the duration of release time will depend on the kind and brand of compressor used, although release times usually take longer than attack times.
For both attack and release times, the duration of each portion of time is fixed by the amount of change which was measured and the necessary increase in state of the input dB. Usually, these features are adjustable; however, there are some units wherein the attack and release times cannot be modified and are determined by the design, specifically the circuit, instead.
- Knee – this is the process of changing between the original state and the final output, which is the compressed state, of a signal which was entered into a compressor. Knees determine whether or not the change in the response of the input signal and that not reaching the threshold and that going beyond the threshold is soft or hard.
With “soft knee”, the compression ratio becomes greater as the level also becomes greater until it arrives at the compression ratio you have set. It allows for a more natural and slowly progressing compression, while the “hard knee” is more aggressive and fast.
- Peak – this provides more compact power on the peak level of the signal entered into the compressor. You have to take note that discerning the peak level is different from discerning the RMS, whereas the latter makes out a more natural compression that creates a more immediate portrayal of how we perceive the loudness of a certain sound, while discerning peak level doesn’t automatically identify with the same.
- Stereo linking – this feature prevents shifting which happens when the compressor compresses every medium one by one instead of as a whole. Stereo linking works to apply the same quantity of regulation of the change of signal to both the right and left mediums so that it will sound unified.
- Output Gain / Make-up Gain – Since compression simply decreases the output sound of the audio, make-up gain can be used to stand in behalf of the compression or attenuation done by the compressor, producing the most conducive output level.
- Look-ahead – this feature provides a mutual settlement when it comes to “slow attack rates” which gives off effortlessly natural change in audio output, and “fast attack rates” which allows for pointing out variations or differences.
Why Do You Need Compression?
When dealing with music, you want it to sound as natural as you can as it is more pleasing to the listeners’ ears. Compression helps create a clearer and better version of the track while still keeping its natural tone and color and without distorting it. It is usually used to make music more compatible and uniform given its constant variation so listeners would be more attentive and engaged.
However, you must take note that although compression can do wonders in making your music livelier, you should be careful not to over-compress your music as it will seem too polished and will sound too unnatural. Compressing beyond what is necessary can adversely affect the tone and timbre of the music.
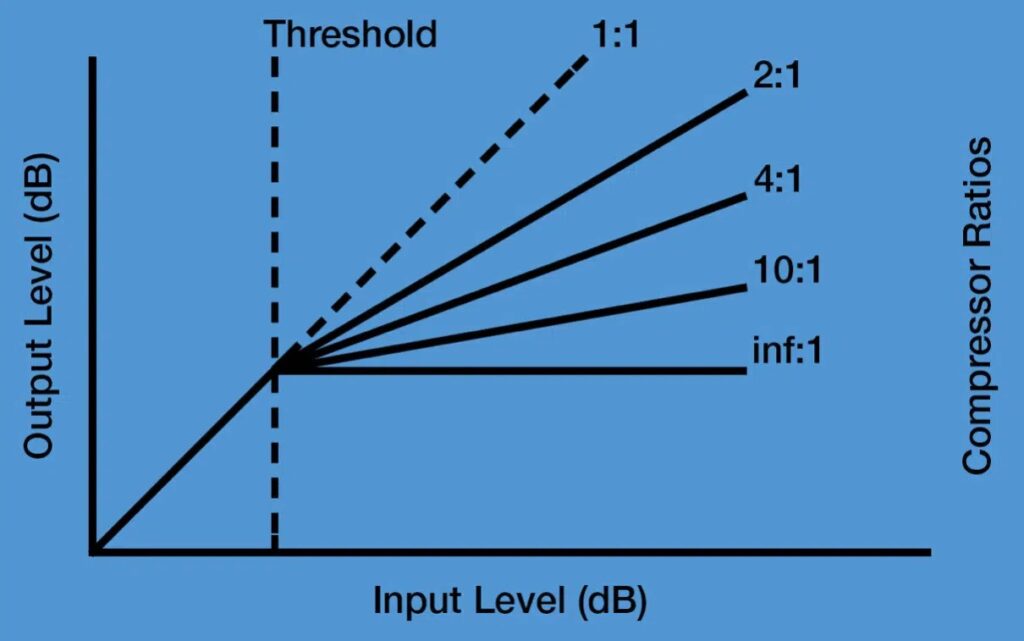
If you come across a 1:1 ratio, it usually means that there is no compression; it is called “unity gain”. A 3:1 is considered a moderate compression while a 5:1 is considered a medium compression. When the ratio is 8:1, it is already considered as a strong compression. 20:1 to ∞:1 (infinity to one) is considered “limiting” and are used to ensure that a signal does not exceed the degree set in the threshold.
So, what is the difference between moderate/medium ratios and higher ratios and why is it important? Moderate and medium ratios smoothly control the dynamics, keeping a larger portion of the audio output’s original state. It is as if you did not apply any compression at all, while higher ratios dramatically affect the audio output dynamics and will sound more unnatural and processed.
The Math Behind Compressor Ratios
The ratio basically pertains to every decibel (dB) sound that goes above the threshold and how many of those decibels the compressor will let through.
dB that goes above threshold : dB compressor lets through
For instance, the compressor ratio is set up at 3:1 and the threshold is set at 10 dB. So, for every 3 dB that exceeds the 10 dB threshold, the compressor will allow 1 dB to pass.
If the input signal goes above the given threshold by 3dB, the compressor will only allow 1 dB which will put it at 11 dB. Given the same threshold, if the input signal goes above it by 6dB, the compressor will only allow 2 dB which will put it at 12 dB.
If the ratio is higher, it is less likely that the compressor will allow any dB pass the threshold.
To have a better grasp and understanding of how compressor ratios work, some people use formulas to calculate it. In computing for a compression ratio, the formula used is as follows:
((Input dB – Threshold) / Ratio) + Threshold = Output dB
So, given the same example above, if the input dB is 13 dB, while the threshold is 10 dB, and the ratio is 3:1 then:
(13 dB – 10 dB / 3:1) + 10 dB = 11 dB
Above, since the input dB exceeded the threshold of 10 dB by 3, and the compressor only allows 1 dB for every 3 dB in excess, the output will be 11 dB.
This formula is useful and easy if you already know what ratio and threshold to set your compressor at. You will just have to apply the necessary numbers. But if you are having a hard time grasping the math behind it, just remember:
- The lower the ratio, the less compression is applied, therefore allows for more change in energy.
- The higher the ratio, the more compression is applied therefore only allows for less change in energy.
How To Effectively Use Compressor Ratios To Your Advantage
In successfully using the compressor, you must make yourself familiar with the controls on the unit because adjusting the ratio knob will work best if adjusted together with other controls. Other controls include threshold and makeup gain.
To use compressor ratios to your advantage, you still have to use the technique of trial and error. Try applying compression at different stages of your recording process as it gives different audio result. Start with a moderate ratio, while setting up your attack time and your release time to a medium setting. With this technique, you will be able to control the audio output without totally disturbing the original audio.
| Ratio | Range |
| 1:1 | No compression |
| 2:1-4:1 | moderate |
| 5:1-7:1 | medium |
| 8:1-19:1 | strong |
| 20:1 to ∞:1* | limiting |
*usually the infinite (∞) to 1 ratio is achieved using a ratio of 60:1
When the compressor starts, adjust the ratio knob simultaneously with the threshold and makeup gain at different parts until the audio output becomes uniform.
If you are hearing a large difference between the loudest part and the quietest part of the track, try turning up the ratio knob, and if it still does not make a difference, try turning it up while at the same time turning down the threshold.
If the track seems aggressive, lower the ratio for a more natural sounding audio output.
Best Compressor Ratios Depending On The Type Of Music
While the audio output still depends on your personal preference and how it sits with your ears, this could help you get started. You will need to consider the kind of music you are trying to record or arrange. If it is on the softer side, you will have to use a different range of ratio. There are other people who would rather focus on the vocals of the music, which is where compression ratio works best.
For softer music such as acoustic music, jazz, and folk, which highlights the vocals, you can try moderate compressor ratio at 2:1. For heavier and more aggressive music like hip-hop and rock, try starting with 4:1.
For vocals, lower ratio is usually used to make it clearer and make it stand out from the instruments of the track. With this said, 3:1 or 4:1 is useful to bring out the color of vocals.
Compressors also help the sounds of band instruments like cymbals and drums to sound stronger and controlled, as their original audio output frequently ends fast. Specifically, for drums, although higher ratios usually work well with it, it varies depending on the sound you are trying to portray; if you want more subtle effect, try 2:1 and if you want a more “slammed” effect, try 10:1.
Guitar sounds are also compressed to have a fuller and stronger and controlled sound. Guitars in general are best at 3:1 while the bass works well at 4:1 ratio.
So now that you have read this article, you can easily use compression ratio to your benefit in order produce the best sounds for your music recording or arrangement. At the end of the day, you will need to consider which compressor works best for you, whether your music is jazz, hip-hop, or if you simply want to give more life and color to the vocals of your music.
Audio Engineer Interviews
Red Hot Chili Peppers Sound Engineer – Dave Rat 2016 Set up
Antony King – Front of House Engineer for Depeche Mode
Gavin Tempany – FOH Tame Impala, Mark Knopfler, Hans Zimmer, Kylie and Eskimo Joe
Analogue vs Digital, How to ‘Hear’ when Mixing with Andrew Scheps
Matthew Walsh FOH Audio Engineer War on Drugs
Bob Strakele Interview – FOH Audio Engineer Slipknot