

Microphones are a singer’s (or speaker’s) best friend, but like any tool, they require proper care to function optimally. One crucial aspect of microphone maintenance is keeping the grill clean. A clogged or dirty grill can affect sound quality, reduce clarity, and even shorten the lifespan of the microphone. Here’s a breakdown on effectively cleaning your microphone grill:
How Do You Clean Microphone Grills
Removable vs. Non-Removable Grills
The first step is to identify the type of grill you’re dealing with. Many microphones have removable grills that allow for easier cleaning. Consult your microphone’s user manual or manufacturer’s website for specific instructions. For non-removable grills, the cleaning process will be slightly different.
The Gentle Approach: Cleaning Removable Grills
- Gather Your Supplies: You’ll need a soft-bristled toothbrush (ideally unused), mild dish soap (diluted with water), a clean microfiber cloth, and a small bowl.
- Dissolve the Soap: Mix a few drops of dish soap in the bowl with warm water. Avoid using harsh chemicals or alcohol, as they can damage the grill material.
- Brush Away Dust and Debris: Dip the toothbrush in the soapy solution, then gently brush the grill to dislodge dust, dirt, and other debris.
- Rinse and Dry Thoroughly: Rinse the grill with clean water to remove any soap residue. Shake off excess water and allow the grill to air dry completely before reattaching it to the microphone.
Alternative Option: Isopropyl Alcohol (for certain situations)
If you’re dealing with stubborn grime or makeup residue, a very light solution of isopropyl alcohol (around 70%) can be used. Important Note: Only use this method on grills specifically designed for it (check the user manual). Apply a small amount of alcohol to a clean microfiber cloth and wipe the grill gently. Avoid saturating the cloth, and let the grill air dry completely before reattachment.
Non-Removable Grills: Extra Care Needed
For non-removable grills, the cleaning process requires more care.
- Use a Dry Brush: Gently brush the grill with a clean, soft-bristled toothbrush to remove dust and loose debris. Hold the microphone upside down to allow dislodged particles to fall away from the microphone element.
- Compressed Air (Optional): If your microphone has a durable grill, consider using compressed air (canned air) to dislodge deep-seated dirt. Hold the can upright and spray short bursts from a safe distance to avoid damaging the grill.
Important Note: Never submerge a microphone or its grill in any liquid. Always follow the manufacturer’s instructions for your specific microphone model.
By following these simple steps, you can keep your microphone grill clean, ensure optimal sound quality, and extend the life of your valuable musical companion.
How often should you clean a microphone grill?
How often you clean your microphone grill depends on how frequently you use the microphone and the environment it’s exposed to. Here’s a general guide:
- Regular Use: For microphones used daily (singers, podcasters, streamers), cleaning the grill every 1-2 weeks is recommended. This removes dust, debris, and prevents buildup that can affect sound quality.
- Occasional Use: For microphones used less frequently (band practice, karaoke nights), cleaning the grill every 1-2 months should suffice.
- Heavy Use Environments: If the microphone is used in environments with smoke, dust, or moisture (live shows, outdoor events), cleaning it more frequently (weekly or bi-weekly) might be necessary.
Additional Signs It’s Time to Clean:
- Visible dirt or debris on the grill: If you see dust, makeup residue, or other visible particles accumulated on the grill, it’s definitely cleaning time.
- Muffled or unclear sound: A dirty grill can affect sound quality, making your voice sound muffled or unclear.
- Unpleasant odors: If your microphone starts to develop an unpleasant odor, it’s a sign of sweat, bacteria, or other build-up that requires cleaning.
By establishing a regular cleaning routine and being mindful of the usage environment, you can keep your microphone grill clean, maintain optimal sound quality, and ensure your microphone lasts for years to come.
Bonus Videos
In these 2 videos from Live Sound Tips and Shure Microphones, we should you how to properly clean your microphone grills.
Video Text:
0:00:00 –>
hey everyone thanks for joining me again I appreciate you coming back to more live sound tips been really happy to see that the first video that I made about washing the windscreens if your vocal microphones has been very well received by a lot of people a lot of people have been sharing it on Facebook and people have been messaging me and leaving comments and few folks have had some really good questions one of the questions that I’ve gotten from a couple different people is do I need to worry about the interior foam lining inside the gorilla 4:58 disintegrating or wearing out as a result of going through a dishwasher while being exposed to a lot of hot water and what I can say is that honestly my answer from my experience has been no you know I’ve been doing this for basically about ten years at the bottom of the hill and these grills have all been washed hundreds if not thousands of time and more likely than not I in a purely a guerrilla way long before the foam has ever desegregated just because the grill looks really shabby in appearance
0:01:01.3 –>
because they do drop they get dinged by you know drumsticks accidental hits from like drummers there were singers I think you know there there are other things that will end up wrecking the grill and make you wanted to get rid of it long before the foam is going to work out if the foam does happen to wear out or if you happen to lose the foam or if it was torn or something you could actually get replacements from sure it cost about 25 cents really I think I’ve bought a bag of a dozen of them a couple years ago just to have a few s Bacchus but I’ve never actually found that washing them it’s going to actually ruin the interior foam lining so not something a warrior the second thing that I wanted to talk to people about just the overall procedure of Washington Ritz really important to make sure that after I’ve given my first pass of pushing them through the dishwasher that once they
0:02:02.8 –>
come out the insurers foam is sopping wet it’s really easy to just flick the grill like this and get the interior sock to come out and then all the infant carrillo size on this washing car run them through again while they’re empty of the phones and I’ll wash all the foam inserts by hand over the sink here alright now that they’ve been washed separately I just take all of the interior foams line them up on the alternating pegs on the dish rack and then usually I just go put it up in the window let them dry out overnight let it get some Sun but that’s all you have to really do it’s just important that you do separate them and make sure that it’s a exterior grill and the interior foam are completely dry before you put them back together I have found through trial and error that if you don’t separate them and you wash them together the grilles will rust in no time definitely what’s going to happen we have huge waste of money all right that’s it thanks everybody I appreciate you coming and checking in for more lives town tips
0:03:01.3 –>
videos if you’re enjoying these and you think it’s useful look please be sure to share these videos with your friends whether they’re engineers or musicians or anyone you think will get something good out of this and keep sending in your questions and comments and if you have questions I’ll address them in future videos or in written blog posts depending on you know what time allows and and what’s the easier it is to get the information across so thanks again and let’s get back out there make the next show even better than the last one to try but [Music]
Video Text:
0:00:01.3 –>
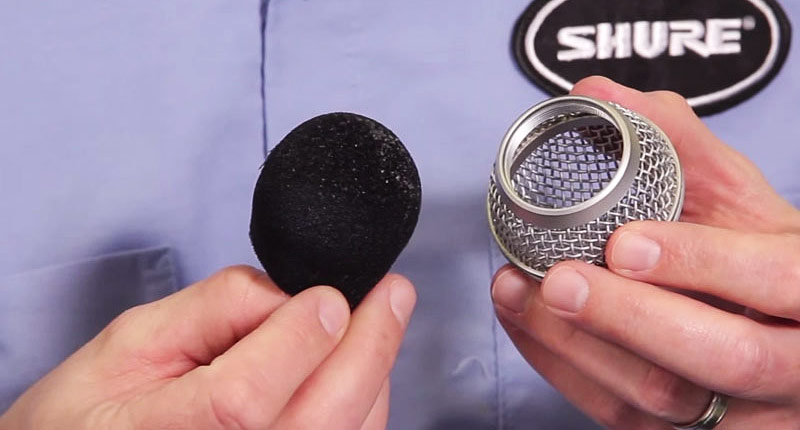
hi I’m Chris Lyons and we’re here today talking about how to clean your microphone and here with us is Shores John born to help us understand more about this process now John first of all why would you really need to clean your microphone ah two reasons you want to keep it clean for hygiene purposes make sure it’s healthy to use your microphone it’s especially important if you’re a venue that has a set of house mics with different bands going through every night and the other reason is to make sure the frequency response to the microphone is still still accurate to much grime and stuff inside the grill can cause a degradation in response okay now clearly this is a problem primarily with vocal microphones what’s the easiest way to clean a vocal mic all of our popular vocal microphones feature removable grills so you can simply unscrew the grill and you want to take the grill off before you clean it and we have a toothbrush here and a q-tip and some mild detergent dilute it with water and you’re just going to dip the dip the toothbrush in there with a little soap brush off the lip stick and grime and chapstick whatever is on there if you’re
0:01:00.3 –>
gonna get the grill really wet it’s a good idea to pull out the foam inside there you use a needle nose pliers and yank out the foam if you notice that it’s really degraded then you’re gonna want to replace the whole grill assembly mm-hmm okay and then how long do we let let the grill dry before we reinstall it on the microphone definitely wanna let it dry overnight overnight before you stick it back on the grill especially if the foam is wet and if you want to use other there’s other accessory kits out there a company called micro foam has kids of accessories that you can use with foam and cloths and swabs and stuff like that that’s a good option – all right well thanks for giving us insight into how to keep our Shore microphones sounding their best Thanks for more information about Shore microphones please visit sure calm
Sound Engineer Interviews
FOH Engineer Garry Brown (Phish, Trey Anastasio Band, Oysterhead)
Behind the Live Sound of Coldplay with Daniel Green
Red Hot Chili Peppers Sound Engineer – Dave Rat 2016 Set up
Antony King – Front of House Engineer for Depeche Mode
Gavin Tempany – FOH Tame Impala, Mark Knopfler, Hans Zimmer, Kylie and Eskimo Joe
Analogue vs Digital, How to ‘Hear’ when Mixing with Andrew Scheps